The internet has always been invested with a lot of Ads, but the amount of tracking, personalized and intrusive Ads has grown exponentially.
While I’ve kept my own devices setup to combat them, the number of smart devices and also users is growing at home. In addition, blocking the ads from displaying or the scripts from running happens on the end device, after they have been fetched and loaded. The Pi-Hole project on the other hand blocks the requests sent by the end device on the network level, which safes resources and bandwidth.
Here is how I installed and configured my Pi-Hole Raspbi to filter and reduce Ads and tracking in the whole home network, across all devices.
Requirements
- Raspberry Pi with SD card & power supply: 35€ single point of failure
- Raspbian Lite: minimal Raspberry OS to keep the device lite and fast
- Laptop with/and SD card reader: to install OS to SD card
- UNetbootin or Etcher: to burn the Raspbian image to the SD card
- Putty: SSH Client to manage the Raspbi remotely
- Pi-Hole: the ads blocking local DNS server
I have used an old Raspberry Pi 2 model B I had purchased in 2015 for my first Eclipse SmartHome project. Since then, this particular Raspbi has gone through quite a few projects, like the RFID Jukebox and a Kura gateway for an Eclipse Open IoT challenge in 2017.
If you don’t have a Raspberry laying around to spare, you will need a Raspberry Pi (35€), SD card(7€), Raspberry Case(6€), a CAT5e cable(0.5€) and an USB charger(10€).
This is less than 60€ for improving privacy and internet safety at home.
Install Raspbian Lite
Go to the official Raspbrian site and grab the Raspberry Pi OS Lite. Use UNetbootin or Etcher to burn it to the SD card.
BTW, here is an alternative installation using Docker, which is also well documented.
Enable SSH
Don’t forget to add a single SSH text file, without the “.txt” file extension, this will activate the SSH server on the Raspberry, so you need to do it before you install the SD card into the Raspberry Pi.
Install Pi-Hole
That’s it, the Raspbi is ready. Now we just need to plug it the card in, connect the Raspi to the router and log into the system using SSH.
First thing to do is change the default password and update the OS
passwd
sudo apt-get update
sudo apt-get dist-upgrade
And install Pi-hole using these two commands
wget -O basic-install.sh https://install.pi-hole.net
sudo bash basic-install.sh
The installation process is quite forward, just remember to choose a good upstream DNS for Pi-hole. Tip: you might want to avoid Google.
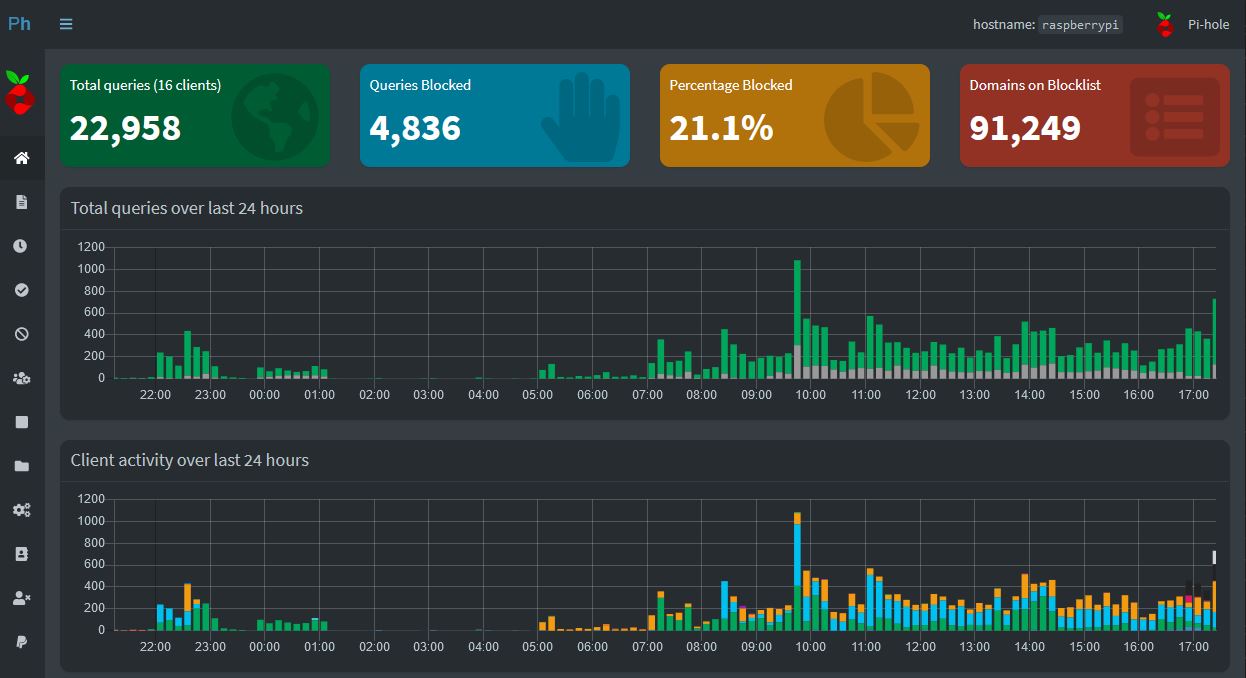
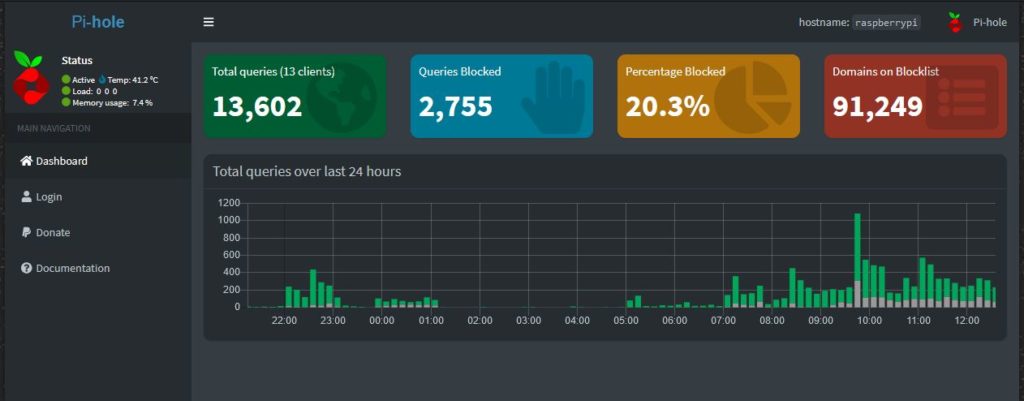
You can check your Pi-Hole Admin interface at 192.168.XXX.XXX/admin
Change the DNS in your Router
You need to change the primary DNS for the network in your router configuration, so that most devices will use it. I write most, because there are a rising number of applications and devices that have hard coded DNS settings to offset this, read more about it on this Reddit thread.
Setup Log2Ram
Log2Ram reduces the number of times that Pi-hole writes to your SD card, which can reduce the lifespan of your SD Card. Check out their GitHub page for all the information you need to set it up and customize it.
DNS-Over-HTTPS
If you would like to have an even more secure DNS you can set up your Pi-Hole to run DNS-Over-HTTPS.
In case you came across DNS-OVER-TLS before and are wondering why I opted for DNS-Over-HTTPS instead, you can read about the difference here on this cloudflare blog post.
In short: DOH provides more privacy, as DNS queries are hidden within the larger flow of HTTPS traffic.
Installing cloudflared
The installation is fairly straightforward. We download the precompiled binary and copy it to /usr/local/bin/ to allow execution by the cloudflared user. Then proceed to run the binary with the -v flag to check it is all working.
wget https://bin.equinox.io/c/VdrWdbjqyF/cloudflared-stable-linux-arm.tgz
tar -xvzf cloudflared-stable-linux-arm.tgz
sudo cp ./cloudflared /usr/local/bin
sudo chmod +x /usr/local/bin/cloudflared
cloudflared -v
We need to create a cloudflared user for the daemon
sudo useradd -s /usr/sbin/nologin -r -M cloudflared
We will create a config file at /etc/default/cloudflared to pass the options to the daemon at startup. It will contain the following command-line options
# Commandline args for cloudflared
CLOUDFLARED_OPTS=--port 5053 --upstream https://1.1.1.1/dns-query --upstream https://1.0.0.1/dns-query
And it needs to be owned by the new user
sudo chown cloudflared:cloudflared /etc/default/cloudflared
sudo chown cloudflared:cloudflared /usr/local/bin/cloudflared
Now we need to create the systemd script by copying the following in to /lib/systemd/system/cloudflared.service. This will control the running of the service and allow it to run on startup.
[Unit]
Description=cloudflared DNS over HTTPS proxy
After=syslog.target network-online.target

[Service]
Type=simple
User=cloudflared
EnvironmentFile=/etc/default/cloudflared
ExecStart=/usr/local/bin/cloudflared proxy-dns $CLOUDFLARED_OPTS
Restart=on-failure
RestartSec=10
KillMode=process

[Install]
WantedBy=multi-user.target
Now enable the systemd service to run at startup
sudo systemctl enable cloudflared
sudo systemctl start cloudflared
sudo systemctl status cloudflared
Now let’s that it’s working
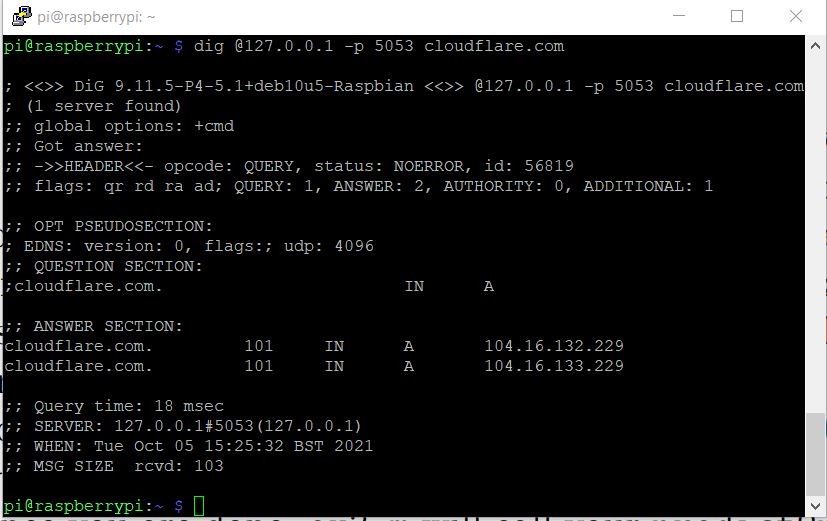
Reconfiguring DNS
We now have a working DNS-over-HTTPS service, at least locally on the Raspberry. The next steps will cover how to implement the service for network-wide DNS lookups.
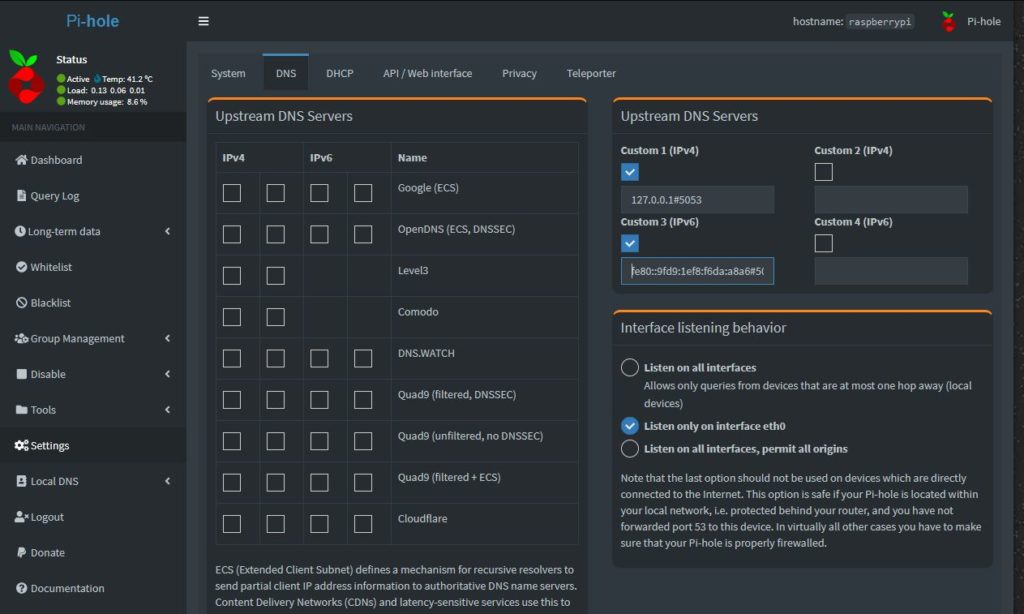
Go to the Pi-Hole Admin interface -> Settings ->DNS tab
You will need to disable the selected upstream DNS server and add the new local cloudflared daemon
Keeping cloudflared updated
To keep cloudflared updated, we will need a weekly cron job. Just create the file /etc/cron.weekly/cloudflared-updater with the following update commands
wget https://github.com/cloudflare/cloudflared/releases/latest/download/cloudflared-linux-arm
sudo systemctl stop cloudflared
sudo cp ./cloudflared-linux-arm /usr/local/bin/cloudflared
sudo chmod +x /usr/local/bin/cloudflared
sudo systemctl start cloudflared
cloudflared -v
sudo systemctl status cloudflared
and adjust permissions
sudo chmod +x /etc/cron.weekly/cloudflared-updater
sudo chown root:root /etc/cron.weekly/cloudflared-updater
That’s it. You now have a working Pi-Hole running DNS queries over HTTPS. You can test your connection here.