A Virtual Private Cloud (VPC) on AWS is an isolated network you create in the AWS cloud.
When you create a VPC, you need to choose three main things.
- The name of your VPC.
- A Region for your VPC to live in. Each VPC spans multiple Availability Zones within the Region you choose.
- A IP range for your VPC in CIDR notation. This determines the size of your network. Each VPC can have up to four /16 IP ranges.
After you create your VPC, you need to create subnets inside of this network. Subnets are like virtual area networks (VLANs) in a traditional, on-premises network. In AWS, subnets are used for high availability and providing different connectivity options for your resources. When you create a subnet, you need to choose three settings.
- The VPC you want your subnet to live in, in this case VPC (10.0.0.0/16).
- The Availability Zone you want your subnet to live in, in this case AZ1.
- A CIDR block for your subnet, which must be a subset of the VPC CIDR block, in this case 10.0.0.0/24.
When you launch an EC2 instance, you launch it inside a subnet, which will be located inside the Availability Zone you choose.
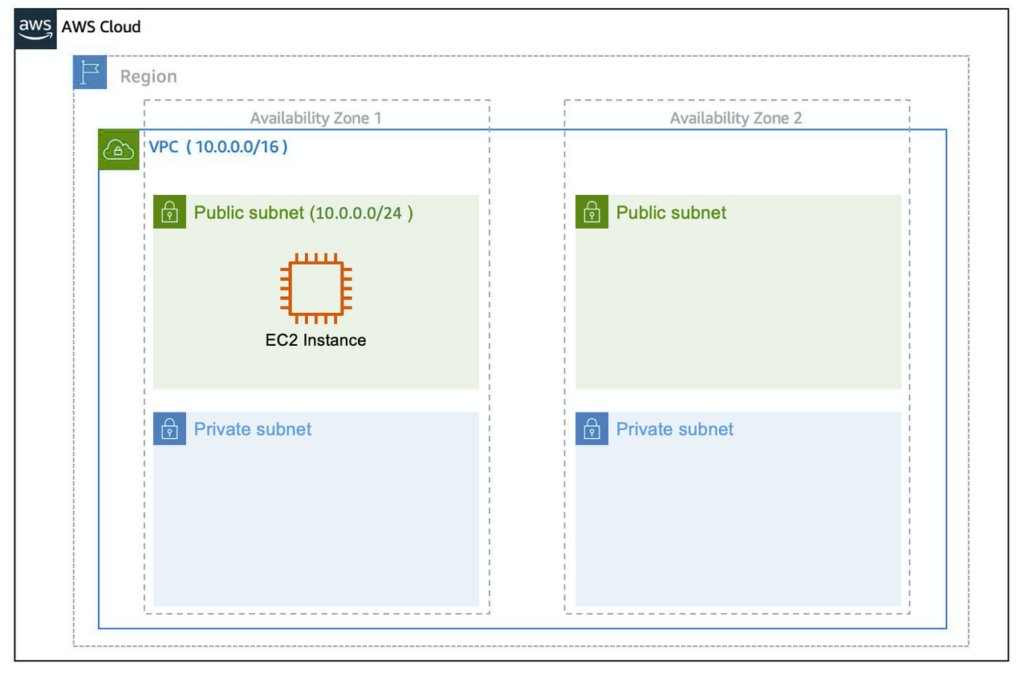
In order to maintain redundancy and fault tolerance, create at least two subnets configured in two different Availability Zones.
Reserved IP addresses
AWS reserves five IP addresses in each subnet. These IP addresses are used for routing, Domain Name System (DNS), and network management. These are
For example, consider a VPC with the IP range 10.0.0.0/22. The VPC includes 1,024 total IP addresses. This is divided into four equal-sized subnets, each with a /24 IP range with 256 IP addresses. Out of each of those IP ranges, there are only 251 IP addresses that can be used because AWS reserves five.
- Network address, for example 10.0.0.0
- VPC local router, 10.0.0.1
- DNS server, 10.0.0.2
- Reserved for future use, 10.0.0.3
- Network broadcast address, 10.0.3.255
Internet Gateways and Virtual Private Gateways
Finally, to enable internet connectivity for your VPC, you need to create an internet gateway. After you create an internet gateway, you then need to attach it to your VPC.
You can also use a virtual private gateway, which allows you to connect your AWS VPC to another private network. Once you create and attach a VGW to a VPC, the gateway acts as anchor on the AWS side of the connection. On the other side of the connection, you’ll need to connect a customer gateway to the other private network.
Routing and Security
When you create a VPC, AWS creates a route table called the main route table. A route table is like a firewall, it contains a set of rules, called routes. AWS assumes that when you create a new VPC with subnets, you want traffic to flow between them, the main route is thus permissive.
If you want to be more granular about how you route your traffic, for example to access the backend only from the frontend and prohibit direct access. You can create separate subnets and provide different routes for each of them.
If you associate a custom route table with a subnet, the subnet will use it instead of the main route table. By default, each custom route table you create will have the local route already inside it, allowing communication to flow between all resources and subnets inside the VPC.

Secure Your Subnets with Network ACLs
A network ACL is basically a firewall at the subnet level. A network ACL enables you to control what kind of traffic is allowed to enter or leave your subnet.
Network ACL’s are considered stateless, so you need to include both the inbound and outbound ports used for the protocol.
| Inbound | |||||
| Rule # | Type | Protocol | Port Range | Source | Allow/Deny |
| 100 | All IPv4 traffic | All | All | 0.0.0.0/0 | ALLOW |
| * | All IPv4 traffic | All | All | 0.0.0.0/0 | DENY |
| Outbound | |||||
| Rule # | Type | Protocol | Port Range | Source | Allow/Deny |
| 100 | All IPv4 traffic | All | All | 0.0.0.0/0 | ALLOW |
| * | All IPv4 traffic | All | All | 0.0.0.0/0 | DENY |
Network ACLs are configured by default to allow incoming and outgoing traffic, you need to change their initial settings if you need additional security layers.
Secure EC2 Instances with Security Groups
The next layer of security is the security group, which is a firewall on the EC2 instance itself. The default configuration of a security group blocks all inbound traffic and allows all outbound traffic. This is because security groups are stateful, they will remember if a connection is originally initiated by the EC2 instance and temporarily allow traffic to respond without having to modify the inbound rules.

If you want your EC2 instance to accept traffic from the internet, you’ll need to open up inbound ports. If you have a web server for example, you will need to accept HTTP and HTTPS requests to allow that type of traffic in through your security group.
| Inbound rules | |||
| Type | Protocol | Port Range | Source |
| HTTP (80) | TCP (6) | 80 | 0.0.0.0/0 |
| HTTP (80) | TCP (6) | 80 | ::/0 |
| HTTPS (443) | TCP (6) | 443 | 0.0.0.0/0 |
| HTTPS (443) | TCP (6) | 443 | ::/0 |
A common design pattern is organizing your resources into different groups and creating security groups for each to control network communication between them.

The example above allows you to define three tiers and isolate each tier with the security group rules you define. In this case, you only allow internet traffic to the web tier over HTTPS, Web Tier to Application Tier over HTTP, and Application tier to Database tier over MySQL. This is different from traditional on-premises environments, in which you isolate groups of resources via VLAN configuration. In AWS, security groups allow you to achieve the same isolation without tying it to your network.